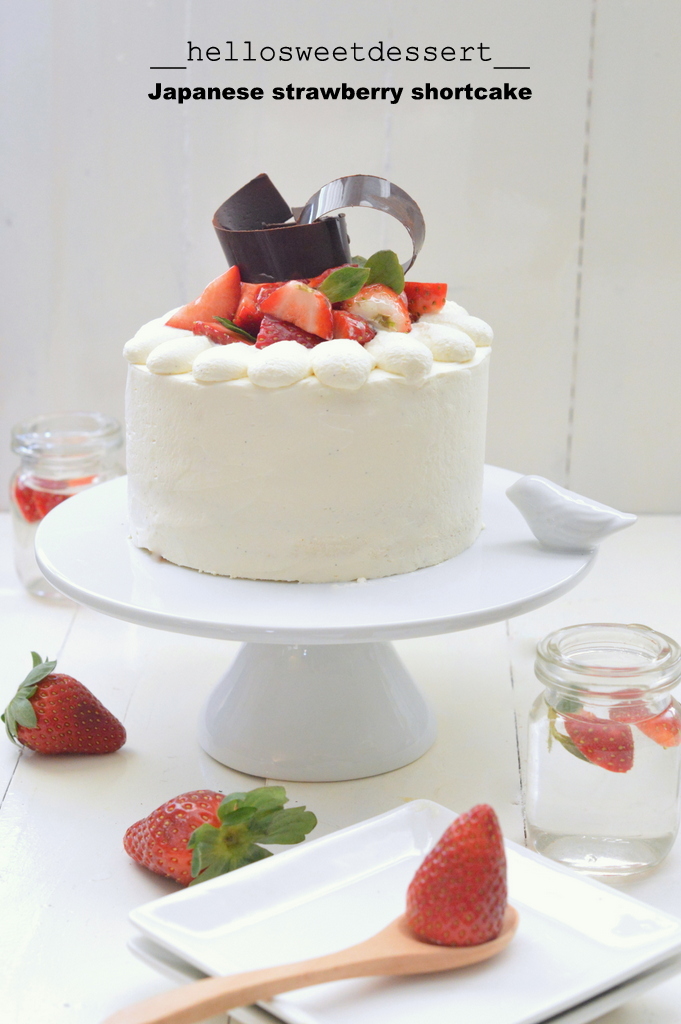
I love cottony, moist and light strawberry shortcake and I really want to make this cake in no time.
This cake is done in a day and serve after few hours. Yummilicious!
Let’s get started on a simple shortcake.
Dear Honey bun Hubby~
HAPPY 12th Anniversary
Thank you for holding my hands
Love, Wife
What is Japanese Strawberry Shortcake?
Japanese strawberry shortcake is a layered sponge cake with a strawberry and whipped cream filling, and whipped cream frosting. Unlike the American concept of strawberry shortcake , there are normally sweet biscuits/scones topped with strawberries and whipped cream.

Components you need:
- sponge cake
- cream Chantilly
- fresh strawberries
Sponge (Egg separation method):
- 4 egg yolks
- 20g castor sugar
- 60g Liddells lactose free milk( or any milk)
- 40g vegetable oil
- 80g cake flour
- 20g corn flour
- 4 egg whites
- 1/4 tsp cream of tartar
- 70g castor sugar
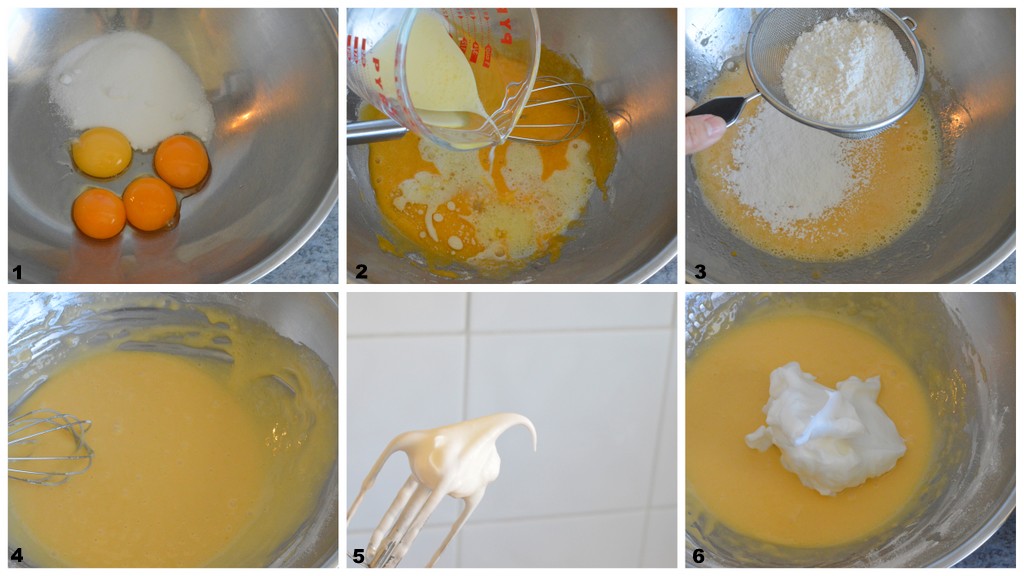
1)Whisk egg yolks and 20g of castor sugar.
2)Mix in oil and milk to well combine.
3)Sift in all flours and mix well.
4)In a clean bowl:Beat egg whites and cream of tartar until foamy,add in castor sugar in 2 additions and keep beating it on high speed until soft peak achieved.
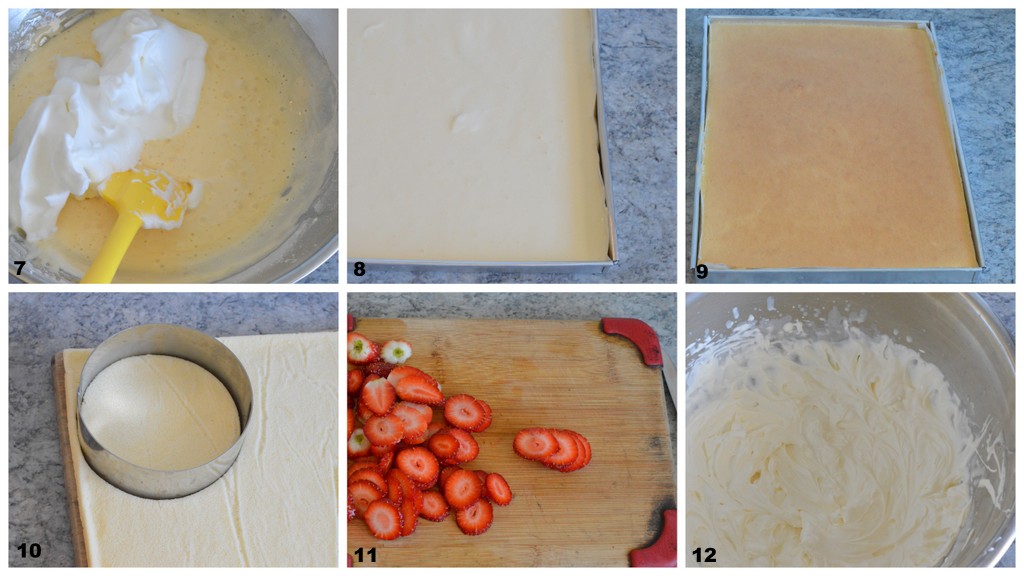
5)Fold in 1/3 of meringue(a) into yolk mixture from step (3) to well combined, then fold in the remaining meringue to well combine without deflating the volume.
6)Pour into a prepared 10″ X 14″ baking tray lined with baking paper.Bake at preheat oven of 170C for 20 minutes or until it springs back when press in, depending on individual oven.
7)Once baked, remove pan from oven and invert onto a new sheet of baking paper. Allow to cool.
8)Once cooled, peel off the baking paper and cut out 4 pieces of 5″ circle discs.
9)Wash strawberries, dry it and slice thinly.
10)Prepare the cream chantilly.
Note:
(a)what is meringue? Meringue means egg whites and castor sugar are beaten to airy texture with alot of air pockets trapped inside.Usually to double or tripled of volume.
(b)Always remember when folding meringue into yolk mixture,it has to be done slowly and gently without deflating the air pockets, usually by using spatula to fold from bottom to upwards in slow motion until both mixture are well combined without any trace of meringue has been seen. Deflating the air pockets will not produce a well risen cake as result.
(c)You can bake this sponge at 180C for 15 minutes.For my sponge to achieve cottony , airy and moist texture, adjust to 170C for 20 minutes until golden brown and spring back when lightly press in.The temperature sometimes greatly depend on individual oven.(watch your oven temperature)
Cream Chantilly:
- 250g Bulla whipping cream ( or any dairy whipping cream)
- 2 tbsp of castor sugar
- 1/2 tsp vanilla paste ( or vanilla essence )
1)Beat cream, sugar and vanilla paste together until thickened or firm peak formed.
2)Spoon 1 cup of cream into piping bag with round nozzle attached.Chill in fridge.
First option to assemble:
Assemble 1 :
- some strawberries, sliced thinly
- cream chantilly
- sponge
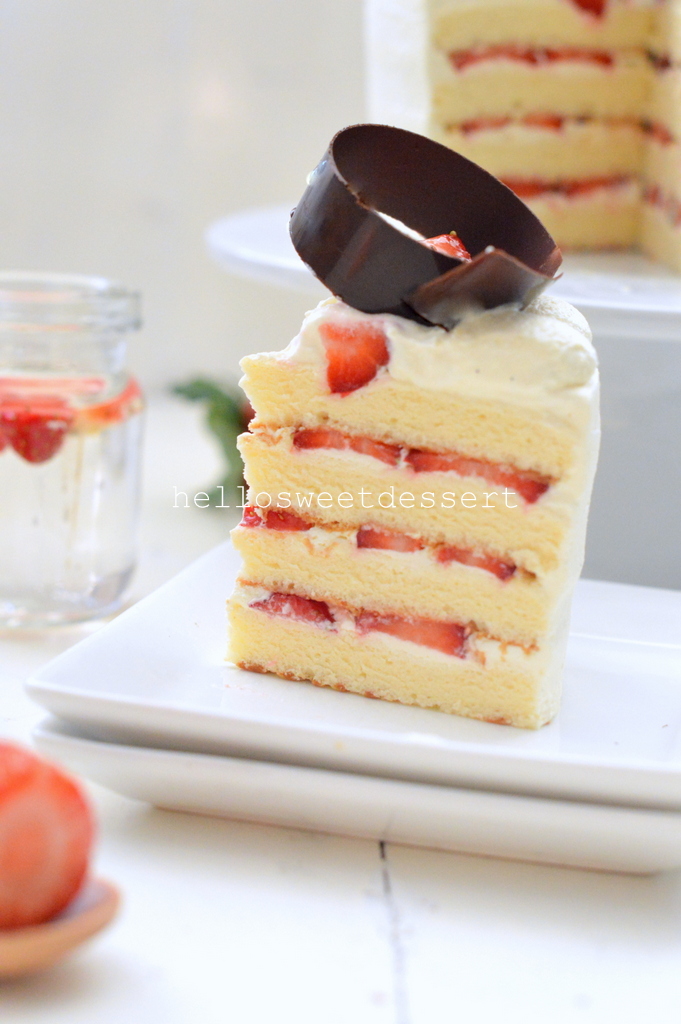
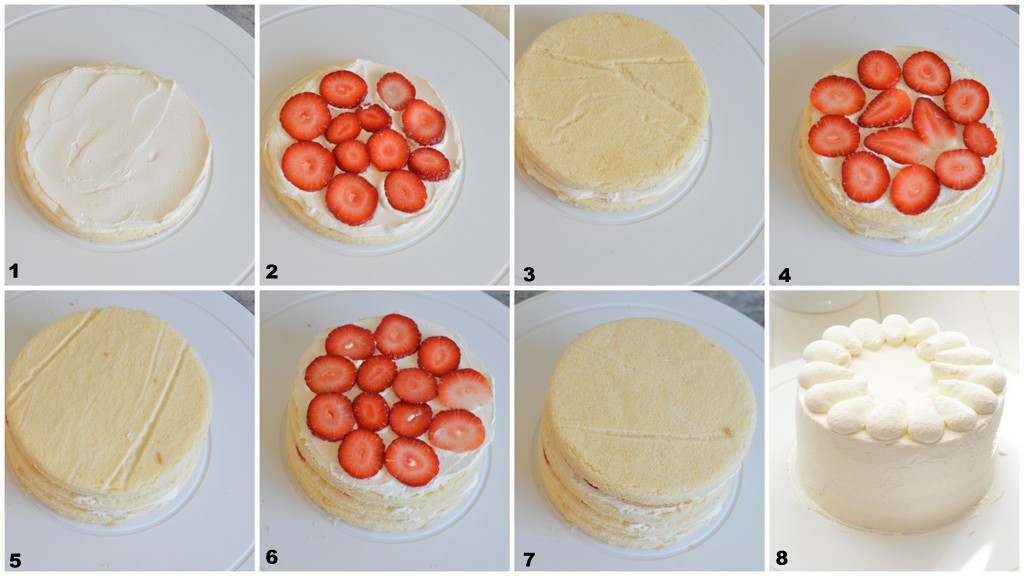
1)Place 1st piece of sponge onto your rotating cake stand or just table.
2)Spread some cream on the sponge, and arrange strawberries onto the cream.
3)Top up with 2nd piece sponge, spread some cream and arrange strawberries onto the cream.
4)Repeat step (3).Finally cover with last piece of sponge.
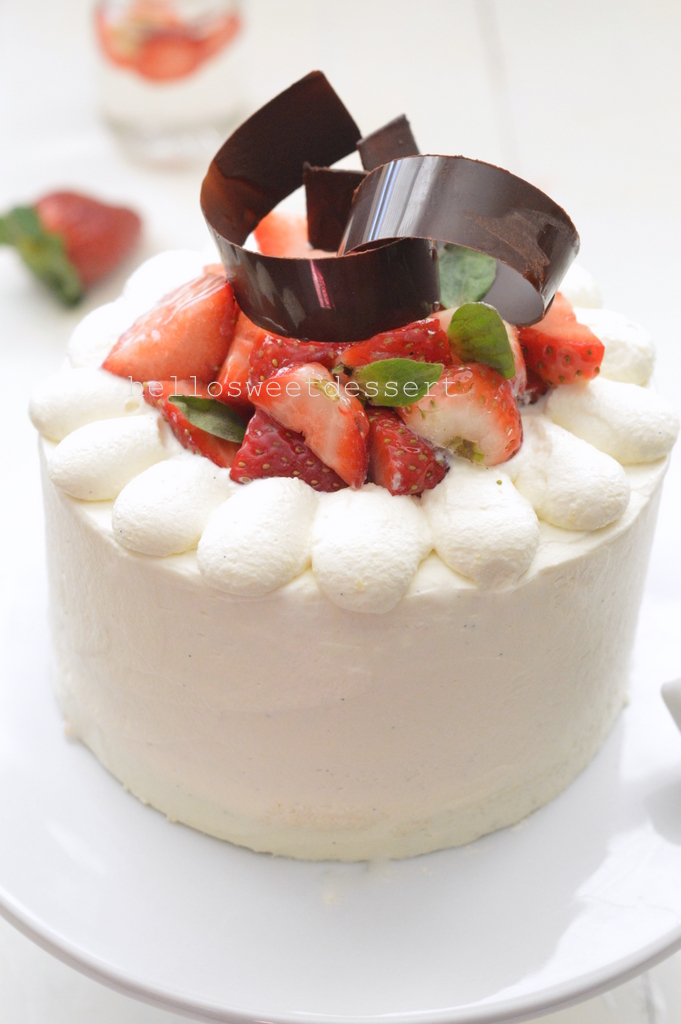
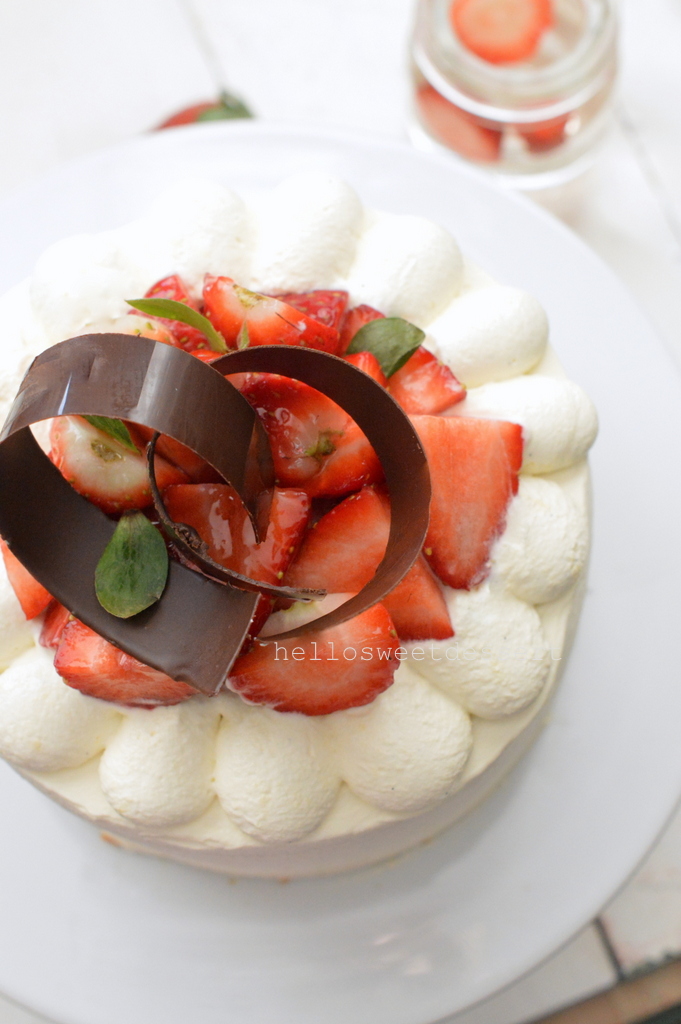
5)Frost your entire cake with cream chantilly.
6)Pipe some cream with tear drop shapes around the edges of the cake, top up with some sliced strawberries.
7)Serve.
Note:
(a)For beginners to frost your cake:You can frost your cake with thin layer of cream first, allow to chill in the freezer for 30 minutes. Take out and frost with another layer of cream.( both layers of the cream should not be too thick)
(b)Decoration is up to your own imagination.So go wild with your imagination.
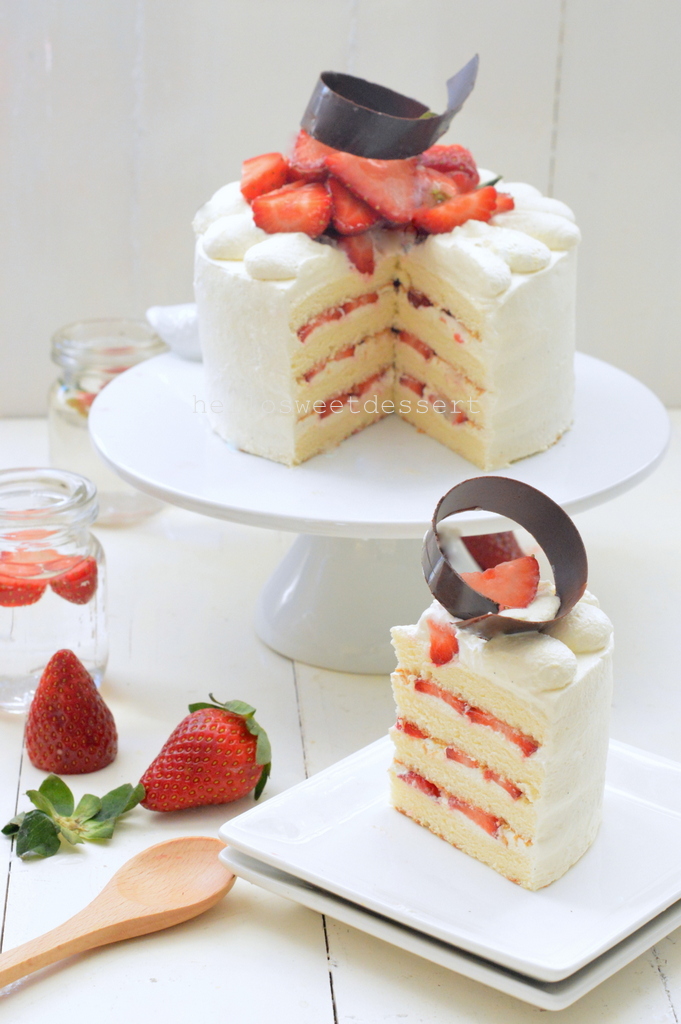
(c)You can just bake a classic sponge cake and slice into 4 pieces but my aim is to save electricity(heheheh, baking can be expensive for the electricity).A classic 6″ shortcake after frosting which produced 5″ circle discs need to be baked for 25-30 minutes and slice into 4 equal pieces with good cutting skills. To me, I want to use minimal time, effort to bake and slice my sponge.With this sponge cake method,you will achieve even size of sponge pieces.
(d)This cake is not too sweet which I like.The berries are on season, definitely the first batch of sweetness as I don’t like sour strawberries.
If happen you enjoy more cream chantilly , feel free to increase the amount of whipping cream, and add sugar to your own taste. Since I love the flavour of vanilla, I added this vanilla paste which you can see these vanilla seeds are visible in my cream chantilly.
(e)Normal sponge cake usually using whole egg and beat into ribbon stage, then fold with flours. I find it, that sponge cake is little dry and requires some sugar syrup to moisten it before layer with cream and berries. Egg separation method which means separate egg yolks and whites, and beat the egg whites with sugar (to soft peak)to create alot of air pockets inside , then fold with yolk mixture will create softer texture. Besides, I bake this under 170C to get more cottony and moist sponge cake.
How to choose good strawberries
- After reading some articles on how to choose good berries, I found the same description of the berries that has to be even size with pointy tail.
- If you found odd shapes of the berries or extremely huge(sometimes it can be square or very odd shape, they are normally genetically modified food, please don’t get them)
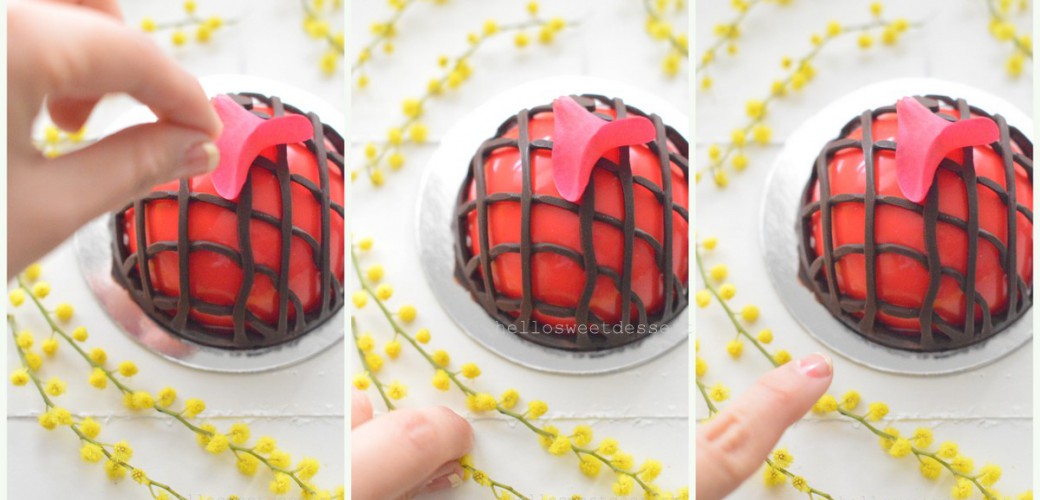
Second option to assemble:
Sometimes, I love to play around with this easy, quick and soft-cottony Japanese shortcake:
1)I used the same recipe but little adjustment on the cream chantilly (probably minus or plus on the cream depending on your preference).
2) using the same recipe for the cottony sponge above, baked in the same rectangle 10″ x 14″ baking tray lined with baking paper, then trim the cooled sponge into 2 x rectangle ( roughly 5″ x 14″ each piece)

Assemble 2:
1) Prepare the 2 x rectangle sponge, chantilly cream and sliced strawberries on hand.
2) Place the 1st piece of sponge onto your rotating cake stand or table.
3)Spread decent amount of chantilly cream on the sponge, and arrange fresh strawberries onto the cream, then lightly press down the berries. Spread small amount of cream onto the berries just to cover it.
4) Top up with your 2nd piece sponge, and spread decent amount of this luscious cream on top of this sponge (I would say depending on are you that kind of cream lover like me? No harm for more cream) .
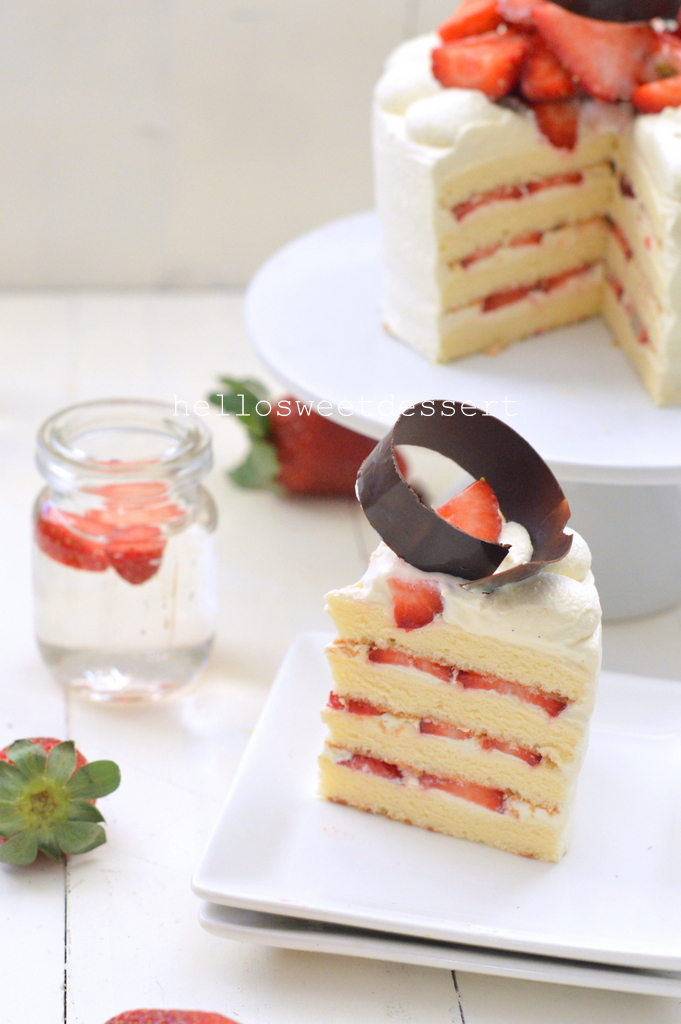
5) Trim all the edges of this cake to give a nice and clean appearance so you can see the layers of this shortcake.
6) Pipe some cream with tear drop shapes around the edges of the cake, top up with some sliced strawberries, or decorate how ever you prefer for your cake with the berries and cream, so you enjoy this cake with your love ones.
7) Serve immediately, or set in the refrigerator for little more ( cover in a cake container so it won’t become dry ) during the hot summer day.
Enjoy ~ 🙂
Hope you enjoy this japanese shortcake with 2 decoration options.
Your visit and comments are greatly appreciated.
Love,
Sivia
hellosweetdessert

Happy Anniversary to you. Lovely cake…lovely couple….
Pei San dear,
Thank you so much for your wishes.
love, sivia
can I frost the cake the night before and leave in the fridge. Serve it the next day. How long will the frosting hold.
Hi Brownie:
1)The frosting on the cake can last 3 days top in a fully covered container or just a normal cake box if kept in the fridge since we are using fresh strawberries. Remember the berries might be the factor, depending how fresh are they, the quality of the berries. Always check by tasting the frosting and berries until the last day you decided to keep. 3 days top in fridge in the country I stay I would say. 2)To answer your another question: You are safe to serve the cake next day if you keep the cake in a cake box or fully covered box in the fridge.
Thanks for visiting and hope you enjoy the cake experience.
Love, hellosweetdessert
Thank you hellowsweetdessert for your answers. Love your baking. I will bake this cake for my church Sunday refreshment. Need to frost the cake the night before. Blessings. Brownie
Dear Brownie:
I am glad if I got to help out. I hope they enjoy this cake. If you want your fresh strawberries(decoration) to last longer in the fridge, feel free to brush with some neutral glaze or if you cannot find, replace with some apricot glaze to make them extra shinny. ^_^
Love,
hellosweetdessert
I need to thank Google a thousand times for leading me for this site! I’m going crazy here, your explanations and recipes are amazing! What a true Pastry chef! Seriously I’m in love with your work, thank you for your inspiring work! Its a reminder of how lovely and fun is to cook ;D
Hi Julia Coimbra:
Thank Lord that He leads you to my site. I have to thank Google too. I am honored and very pleased that you love my work. I cannot thank you enough. It is always good to be appreciated. Sharing is caring, hope you have more fun from now on to create your favourite food. ^_^
Love, hellosweetdessert
Hi Sivia, have that problem too…electricity hehe always get complain about it…but our new house is in progress and i will get my dream kitchen very soon…when that time happen no one could stop me from baking….hehehe..this recipe is on my list…
Hi Kelly Ng:
Hi Kelly, Electricity is really a big cost in our baking life.That is such a wonderful news that your new dream kitchen is almost done, and I am certain nobody could stop you from creating magical cakes from this beautiful kitchen. I am so happy for you. Hope you like this simple shortcake of mine. Thanks for visiting my blog again , Kelly.
Blessed with love,
hellosweetdessert
Hi Sivia, i love this cake and it already on my list . Will let know how it goes after i try this recipe… again thanks so much for replying….
Regard :
Kelly Ng..
hi KELLY Ng:
My Pleasure and hope you like this recipe too.
Lots of blessings,
Sivia
I’m and to be honest i am still reading your white angel lemon orange manggo recipe…lol..i am so attracted with the glaze..very shining..
Hi Kelly Ng:
I am blessed that you visit my blog and like the glaze too. Thank you for your support. ^_^ You have a very wonderful blog fulled of recipes, fantastic blog.
lots of blessings,
sivia
Hi sivia, i loved all your recipes and wish to see more of your recipe with mirror glaze in the future. Have a nice day!!
Regard
Kelly Ng..
Hi Kelly Ng:
I am glad you enjoyed the visit here.Yes, I have been resting due to health issues,but i will try my best for more recipes, hopefully. Have a good day.
filled with love,
sivia
Hi, I noticed the egg whites are beaten to soft peaks for this recipe. Normally, I see recipes for chiffon cakes call for egg whites to be beaten to stiff peaks. Any reason why this recipe is soft peaks? What’s the difference in the resulting cake texture between soft and stiff? I’m always so confused..
Hi Pei Sze:
Thanks for your answer.Chiffon has to be beaten to stiff peaks to create the stiff, bigger air pockets trapped in the egg white (We called it as meringue when beaten in high speed)In short, the end result for the cake or would I say chiffon cake texture normally is much drier, this is my personal experience and observation.Stiff peaks for meringue in chiffon cake gives more stable air pockets and gives a stronger body to the cake.If you want me to explain more, there are many types of cakes require stiff peaks for their meringue, such as joconde. Let’s talk about soft peak for meringue(Egg white normally beaten with some sugar in high speed), soft peak normally is not use for chiffon cake. The reason chiffon cake has strong body because of the stiff/hard peaks of meringue . Normally sponge cake we use on cream cake or another example is Japanese swiss roll, we like to beat to soft peaks instead, which mean smaller air pockets are created .When you fold the soft peaks meringue into any other flour mixture, with the help of different baking temperature, the sponge cake texture resulting softer and moist texture compared to stiff peaks meringue.Japanese cotton cheese cake in bakery shop is normally beat the egg whites into soft peaks and bake in lower temperature to create soft and moist cottony cheese cake. If you brave and adventure enough, try to incorporate stiff peaks meringue into a Japanese cotton cheese cake recipe,the cottony texture will not be used there anymore because texture is much drier, not so cottony and soft anymore as given name.Last but not least, some home bakers love to bake chiffon cake and slice into few layers then layer with cream. Indeed, it gives a stronger body, but to me, it requires simple simple syrup to moisten each layer of the chiffon sponge before top with cream. Because I want my strawberry short cake to create the much softer texture and without using any simple sugar syrup to moisten it, therefore this soft peak meringue is incorporated in this recipe.Hope i did not confuse you and it helps you to clear your confusion between stiff peaks and soft peaks. Thanks for being so patience.
lots of love,
hellosweetdessert
Wow thank you for taking the trouble to give such a detailed reply. It really helps me alot. I always get confused between the 2 peaks. Now I know! Indeed, when I bake my chiffons that call for stiff peaks, I always end up with a dry cake and I always wonder where did I go wrong. I can’t wait to try this recipe of yours. Looks so yummy. Thanks very much again! 😀
Dear Pei Sze:
My pleasure. hope you enjoy your baking time.Thanks for visiting here.
lots of blessing,
hellosweetdessert
Pingback: karrotcakeblog
Hi, I just made this cake for Thanksgiving and it was a HUGE hit. I am an amateur baker so was worried about how it would turn out but it was so light and fluffy. I love the simplicity of the recipe and ingredients. I made 2 batches and baked them in two 8 inch round pans and made a bigger 4 layers cake. The cake was all gone by the end of the night. Thanks for sharing!
Hi Ameteur baker:
Thank you for dropping such a wonderful message here and I am blessed all your love ones love this recipe. Although it may be simple but the effort and love that you added to this cake is worth the time. Thanks again for loving this simple recipe. May all your love ones could enjoy more of your cakes. Happy baking
Love;
hellosweetdessert
hello, i have been combing through thousands of different recipes but i think i love yours the most. do you think you sould provide me with a conversion if i want to bake this in a 20cm cake tin?
Hi Zac:
Thanks for dropping by.To answer your question, I cannot offer the similar baking time or temperature or method to allow you to bake like mine, but there are few ways I can suggest:
a)Since you like the way I baked once in one baking tray 10 x 14″, and slice into 4 equal slices.If you like my idea on baking on baking trays, you might have to increase the amount to 4 times of its original amount i provided, then bake on 4 separated 10×14″ baking trays, then cut out to 4 equal 20cm(8inches) round circle piece. Increase the cream to 3-4 times the amount I provided.Depending on how much cream you personally like, you can make extra, the rest can keep it for other use. The downside of using this method is:you need to bake 4 times of the sponge in 4 separated same size baking trays, same baking time and temperature,but you might have extra remaining sponge after you cut out to your desire size. Are you up for this, benefit using this method is: 4 times of the amount that i provided(for the sponge), 3-4 times of the amount of cream I provided on the recipe, of course increase the strawberries you desire. If you dont mind this method.
Sponge (Egg separation method):
16 egg yolks
80g castor sugar
240g Liddells lactose free milk( or any milk)
160g vegetable oil
320g cake flour
80g corn flour
16 egg whites
1 tsp cream of tartar
280g castor sugar
Cream Chantilly:
750-1000g Bulla whipping cream ( or any dairy whipping cream)
6-8 tbsp of castor sugar
1 1/2 tsp vanilla paste ( or vanilla essence )
b)This method will require the 2 round cake tins of 20cm(8″), you might need to just increase the amount of sponge to 2 times of its original.So pour the sponge batter into 2 separated round cake tins, bake at 180C for 25-35 minutes depending on individual oven, watch your sponge, insert skewer in the middle and comes out clean, then its done.After cool down the sponge from the cake tins, you have to manually use knife to cut each sponge to 2 equal slices. So you ended up with 4 slices sponge from two 20cm cake tins.Hope you understand. In short: Increase the sponge amount to 2 times of its original amount, then increase the cream to 3-4 times of its original amount that I provided in the recipe. More cream or less depending the person who frost the cake, so prepare more cream won’t hurt anyone, you agree?This method will no longer be like my simple way,this method requires you to slice it manually as well. Baking time as stated above here.Watch your sponge.
Sponge (Egg separation method):
8 egg yolks
40g castor sugar
120g Liddells lactose free milk( or any milk)
80g vegetable oil
160g cake flour
40g corn flour
8 egg whites
1/2 tsp cream of tartar
140g castor sugar
Cream: 500g whipping cream, 1/2tsp vanilla paste(add more if you like more),4 tbsp castor sugar(if prefer sweeter, add more, taste it)
c) last way I suggest is: not using 20cm cake tins. Bake into two japanese strawberry shortcakes with 6inches, by everything in my recipe, but to increase to 2 times, by mean bake two times, two baking trays of 10 x 14″ ended up with 8 slices of equal sponge, and make 2 separated shortcakes. If you prefer my way.
If you are happy with this methods, go ahead with one. My original cake is aim for small cake, short time and try saving electricity as much, but still create moist and cottony texture.
Remember there are many other ways to bake this,to find the one which suits you, sometimes you might enjoy the methods, some might not like it. So, like I mentioned, depending which way you prefer,are you aim to save time,for bigger size, all these take into consideration.I don’t want to confuse you, there are many ways to do it, to suit each individual. So hope this helps, enjoy.
If you have any questions, feel free to ask.Sorry to reply you late. Remember everyone has different taste, some like and some might not.Pick the one you prefer.
Happy baking
love,
hellosweetdessert
thanks so much for the detailed reply! (making me love your site even more) i might just try the second method! so what you are saying is that your original recipe will be able to fit into 1 20cm round cake tin?
To Zac,
It should be no problem in fitting my original amount of recipe into one 20cm round cake tin,unless your cake ton is super shallow.Try get a deeper cake tin.so all in all,double the my original recipe,pour into two 20cm round cake tins and bake longer as I mentioned in first message.check the cake like a hawk. You will get four equal layers of 20cm sponge after you slice it. You will get a tall shortcake after your frost it nicely,looks like my shortcake with 4 layers or sponge and cream.hope I dont confused you.
Happy baking.
Love,
Hellosweetdessert
hi is it possible to swap out the vegetable oil with butter?
Hi nuyiq:
Thanks for your visit and sorry for the late reply.
To answer your question, Yes you can replace the same amount of vegetable oil with melted butter. Just ensure the butter is fully melted, by using either double boiler or microwave safe mode.
Happy baking! Happy New year
Love,
hellosweetdessert
Dear Sivia, Thank you . I made this cake and turned out very good . Hope you are resting well and feeling better . Is there anything I can pray for you . Blessing.
Silik Lam:
Dear Silik, thanks for trying my recipe and very pleased that you enjoyed it. Thanks for your prayers, Sorry for late reply due to being unwell few days, now i hope this reply did not come to late.Blessing to you and family.
love,
hellosweetdessert
Sivia
Hi,
How deep must the 10×14″ cake tin be? Mine is for sheet cake and quite shallow (about half inch). Is that ok?
Hi lily
Sorry for late reply due to being sick for awhile. To reply you, my cake pan is 1 inch deep. If you have no choice, just have the same size but shallow cake pan, you might need to line the baking pan with extended baking paper for 4 edges, roughly make into slightly more than 1 inch deep for four edges, so you can continue pour the batter into the same size pan to bake as per said in the recipe. This is the quickest way to rectify your situation. Ensure the baking paper is thick enough to with stand the batter. I think it should be fine. Sorry for late reply hope it helps. ☺️ Enjoy baking. From hellosweetdessert
Hi
Thanks for the reply! I did try the recipe (2x recipe in 2 9″ pans) yesterday and it turned out ok but with a few issues.
The sponge turned out soft but quite dense – is this because I didn’t whip the egg whites enough? I did try to whip till soft peak. Also, the sponge shrank when I removed it from oven as well. My temperature was 160c which should be right.
Could it be because there was too much batter for each pan? I wish I could send you a picture of the cake to help trouble shoot!
Dear Lily:
When you tell me the sponge is dense, immediately reminded me of when I first try making sponge by folding meringue (egg white) into flour mixture. The main reason I could think of is the folding you are doing. Most of the time, you might deflate most of the air pockets while combining flour mixture and meringue together. I can’t see the process you are folding, but this reminded me of many times I try learn how to make a sponge when first I learnt to bake. This comes with alot of practice, and the tool you use when folding and also the way you fold it. Best to fold meringue with any other batter is using spatula for beginner, need to be slow and gentle. I suggest you to watch some you tube on how to fold meringue into flour batter or how to make a Japanese soft sponge if you need more tips on it. If you already know how to master folding method for sponge(please ignore the video). Then it might came with some factors of the issues; 1) have you sift the flour few times? it helps to loose the flour and incorporate more air into the flour for better airy sponge. 2) make sure you do make a soft peak meringue,3)tool to use in folding two mixture together. For beginner, suggest to use spatula, when you master the skill perfectly, you can introduce Balloon whisk to help, some people even use their bare hand to fold it but I won’t get you do it with a glove on hand. Wish I could see how you fold the two mixtures to see why your sponge is dense. So far, I could think of the reason of you deflating the air pockets in meringue while folding it. Don’t give up, this requires some practice, and that’s how I learnt to make a sponge throughout some failures like dense sponge too. Hope this helps you to clear your problem . Lastly, thanks for trying my recipe. Hope you manage to make a perfect sponge very soon. From hellosweetdessert
Hi lily again:
The second issue you have for sponge shrank is because of the way you fold the meringue and flour mixture, it must have deflating most of the the air pockets in the meringue itself. This explains that you have a dense cake due to shrank. Most of the people made the same mistake too. Don’t give up, practice and watch some You tube video to assist you in this area. Thanks for trying my recipe again. Do not give up. From hellosweetdessert with lots of support to you
Hi lily,
For the recommended temperature to be baked this sponge is 170 to 180c to achieve cottony texture. If you are using two separated round cake pans by using one recipe amount, 160c is slightly too low for the sponge to rise probably if you did not have problem in folding the meringue with flour batter. Unless your oven is slightly hotter than other oven and able to bake everything fine, otherwise I won’t not recommend to bake at 160c for short time period. Hope this helps. Do not give up. Keep practicing. From hellosweetdessert
thank you Sivia, thanks so much for your sincere help!
(1) i used a silicon spatula to do the folding in of meringue to yolk mixture and was careful to not deflate the bubbles. i think the reason should be the meringue is not firm enough, so need longer mixing.
(2) i used 2 times of the recipe amount in 2 9″ pans, which means 1 full recipe amount in 1 pan. it almost filled the pan to the brim – maybe it didnt have enough space to rise?? also, i saw your other post for honey sponge, you had instructions to leave the pan in the oven for a while with the door open at the end so that the temperature goes down gradually. maybe i should do that for this too?
(3) have you heard of the “cooked dough” method? it basically cooks the flour in heated butter so it the flour is “cooked” first before it is mixed with other ingredients that contain water, so that gluten doesn’t form. your honey sponge sounds like that sort of method. will that be a better recipe for soft sponge?
Hi Lily:
Thanks for your reply.
1)If you are using the right tool and right method to mix it well, it should not have problem in deflating the bubbles. In your first message, you mentioned that your meringue is right peak, which is soft peaks.So i assume you did not have problem in whipping the right peak. Remember, there are 3 peaks:soft, medium and firm. When you master this, you can create soft sponge or chiffon just by using different peaks.Hope you create the right peak like you said in the first message.Soft peak is curl up when you lift up the meringue with whisk and the smaller air pocket trapped inside the meringue(egg white whip)which make a softer texture in sponge.Also create a soft texture if you bake in the right temperature and time.
2)My recipe made a 10X14″ baking tray sponge , baked for either 180C 15 minutes or 170C 20 minutes with oven un-opened during baking, without the water bath or steam bake method. And the sponge turned out soft in texture everytime, without any door open ajar.The reason I bake on a tray is to bake at the minimal time frame and able to cut into few layers of sponge without slicing it like others.Something quick and fast. When you mentioned that you baked at 160C, I assumed you bake at same time as me(Because you did not mention how long you bake at 160C in the 29″ cake), which definitely guarantee with not-so-successful sponge cake.Which I would not recommend.
3)If you insist to bake my recipe into a totally different cake pan, you need to adjust the baking time and temperature accordingly to your oven. If you want a soft sponge, follow my method , it turned out well, I promise if you make no flaws during the process. If you happen has no similar cake pan, and have no choice but to bake in a 2 round cake pan, you need to be careful with the baking time if you want to bake at 160C, i suggest you to bake for at least 30 minutes or more at 160c, and insert with skewer in the middle if comes out no crumb,which means it is done.You dont need to bake with the door open ajar( ovendoor open slightly), this is not using water bath method which require to let the steam out while baking in water bath. When you talk about water bath method and door ajar(open the oven door slight gap) , which I do not use in this normal sponge cake at all, it is totally two different topics.
4)My aim for creating this method for sponge is to save baking time and make a strawberry shortcake with ease, and turn out soft cottony texture if you follow all instruction and make the peak right, folding method right and baking time and temperature right,those are very crucial.
4)I do not have much information of the cooked dough method since most of my recipe are based on western culture recipe, there are limited recipes of using Asian traditional methods in my blog.In the world of western patisserie knowledge, I have not read of cooked dough method, but i am certain in Asian baking world, cooked dough method might be commonly use. In my knowledge, so far i have studied, gluten is crucial in creating body structure for any bake goods, without the gluten, the body might be not as stable.In making bread, some baking industry added gluten into the bread to make a good body structure. So to us, gluten is very crucial.When you said, the butter restricted the gluten to form, I wonder why gluten (which found in flours) is added in the first place. We need certain amount of gluten to form a good body structure cake, it has no relation to make the sponge softer in my personal opinion.Depending on how much gluten you added and how you long you mix the flour mixture before folding into meringue.Too much gluten form can be resulting tough cake.So depending on the mixing skills.There is always a reason to have gluten inside for gluten cake. If you compared a flourless chocolate cake(normally using eggs) and a chocolate cake with gluten(flour added inside), you can slightly observe the chocolate cake with the flour (gluten inside)has slightly more body texture to the cake. Hope this does not confuse you.
All in all, my recipe here does not require cooked dough method or water bath method and always create a soft texture sponge. Since you have no similar cake pan, and you have no choice to bake cake in 2 round cake pan of 29″, extend the lined baking paper above the brim so if the cake able to rise properly, if would not flow out or shrink.. If you insist on baking at 160c, prolong the baking time at least 30 minutes above.Watch you cake done-ness.
There are so many methods, so many different types of cake with different method, and my recipe is stick with one way I love to do always and always turn out great and hoping to share with you guys, Hope you manage to find the best method you prefer and like. Practice makes perfect and enjoy baking and try not to confuse yourself with too many methods.Some people claim A method is good, but might not useful on certain recipe.So stick with whatever you are good at, and everything will be fine. Enjoy baking and never give up.Thanks for trying out my recipe once again.
lots of encouragement.
hellosweetdessert
Hi, may I check if corn flour and corn starch the same?
Hi Tracy,
Thanks for your visit. You can use cornstarch or continue flour. Both are the same. Happy baking and hope you like tjis recipe.
Love,
Hellosweetdessert
Hi Tracy,
Sorry for the typo. It’s corn flour I meant. Corn flour and cornstarch are the same.. Thank you
Hi, can I just clarify whether the tray size is 10″ x 14″? Because I couldn’t cut out 4 circles of 6″ from that, I could only get about max 3 circles. Did I get anything wrong?
Hi Serene:
Thanks for your kind observation. It is indeed 5″ slice of circle sponge out of the 10X14″ tray, instead of 6″ circle sponge. My round cutter has stated it is 6″ on the sticker but after I measured it , it is indeed 5″. Sorry for the mistake created from the mislabel.
Note the cake is actually 6″ after the frosting as the final cake.
HI Serene:
The sponge cake after cut out is 5″ and produced 4 pieces. After frosting the cake with cream , and the cake size became 6″ .Thank you your visit.Hope it doesnt confuse you.Good day to you.
Yours Sincerely,
hellosweetdessert
Hi!
I sincerely appreciate your time in responding to me in such detail and for your prompt replies, not just to me but to everyone else as well. I’ve read through all the advice that you’ve given pertaining to this recipe and it was indeed a great help to me. As a novice baker, it really gave me the confidence to try out this delicate and challenging recipe, and it helped to make my baking experience more enjoyable. I managed to make the cake and was thrilled that it turned out to be a success even on the first attempt, especially seeing that the texture of the cake was so moist and cottony. I’m really grateful again for your post. It has indeed inspired me and increased my passion for baking.
Thank you very much
Hi Serene:
GOOD day to you serene. Thank you visiting my site and find great help from the recipe. I am thankful that you love the recipe and turned out into a lovely cottony cake that you enjoyed. Again, truly sorry for any inconvenience. I hope you enjoy the baking journey and find happiness in baking for your love ones. HAPPY BAKING serene.
Yours sincerely,
Hellosweetdessert
Pingback: Japanese Strawberry "Shortcake" - It's a Cake! - poke the dough